How to turn your old laptop into a 3cx PBX – your local phone central system. Complete guide – step by step.
What you will need is a Static IP, old laptop that is working and a usb stick.
-
Introduction
-
Step 1: Check the System Requirements
-
Step 2: Check VM platform requirements (skip this if you are not using a virtual machine)
-
Step 3: Check the Network & Firewall Requirements
-
Step 4: Install Debian for 3CX – download link (ready mage image, ready to install)
-
Step 5: Upload the Configuration File
-
Step 6: Configure the Split DNS
-
Step 7: Configure your Firewall
Introduction:
To streamline installation and management, 3CX offers a Debian Linux ISO. It’s crucial to dedicate your Debian Linux instance solely to 3CX, avoiding any other installations or configurations. System updates should be avoided via command line, as they’re handled by 3CX after thorough testing. Any alterations to the system could void support.
Step 1: Check the System Requirements
Ensure your machine meets the minimum requirements of at least one dedicated CPU or 2 vCPU cores and 2GB of RAM. Consider additional resources based on factors like simultaneous calls, active users, and call recording usage. 3CX can be installed on hardware compatible with Debian 12.
- Υour machine needs at least one dedicated CPU or 2vCPU cores and two GB of RAM. If you are self-hosting your machine and your hoster is using a shared CPU, then you need two cores!
- Review the suggested hardware specificationsto allocate additional CPU time and RAM resources based on:
- Number of simultaneous calls the system handles.
- Number of active users – 100 Web Client active sessions is more demanding than 100 occasional calls via IP phones.
- Call recording use – stresses the system for audio mixing and file storage.
- 3CX can be installed on any hardware that runs Debian 12. If you want to do a barebone install ensure that the hardware works with Debian 12 and that the hardware vendor will support you with any issues. We can not assist with any issues in installing Debian 10 on barebone hardware.
- Do not configure a virtual network, VPN interface or the TeamViewer VPN option on the 3CX host.
Step 2: Check VM platform requirements (skip this if you are not using a virtual machine)
3CX is tested and supported to run as a Virtual Machine on these hypervisor platforms:
- VMware – vSphere Hypervisor (ESXi) 6.5u1 and above, with VMWare Tools package installed.
- Microsoft – Hyper-V Server (6.2) and above capable of running Debian 12 – see our Hyper-V Pagefor required settings.
- KVM 2.8 and upwards.
- Citrix XenServer 7.0 and up.
Avoid using 3CX on converted VMs (P2V) due to possible timing issues, causing the guest OS not to sync with the hypervisor’s timer.
Step 3: Check the Network & Firewall Requirements
- On premise installs are only supported on properly configured RFC 1918 private networks,e. 172.16.0.0/12, 10.0.0.0/8 or 192.168.0.0/16 IP range.
- The PBX needs to be configured with a dedicated public IP.
- On premise installs require Split DNS so that the 3CX FQDN resolves on both the internal and the external network.
- Installing 3CX on a machine behind a NAT device requires port forwarding. See the Firewall & Router Configuration Guide.
Step 4: Install Debian for 3CX – download link (ready mage image, ready to install)
To install Debian for 3CX:
- Download the latest 3CX ISO. For V20 ISO click here. For V18 ISO click here.
- If you are using a hypervisor/virtualized OS, set the CD option to boot from the ISO and ensure the CD drive is set to connect on startup. If you are installing on a mini PC, then create a bootable image, plug it into one of the available Mini PC’s USB ports and set the BIOS to boot from the USB drive to start the installation.
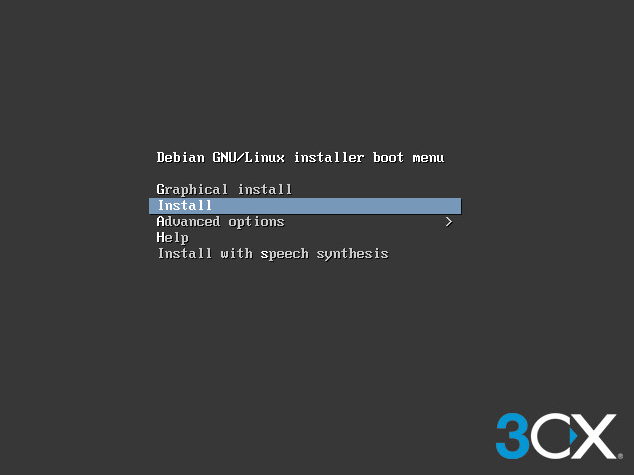
- Boot your system with the downloaded 3CX ISO, select “Install” from the main boot screen and press the <Enter> key.
- Important: You need to configure a static IP address for the 3CX host machine. Select <Go Back> or press the ‘ESC’ key when asked for the hostname to first set the IP address of the system and then configure the hostname. The system’s IP address affects the running PBX services, connected clients and IP phones. To change the IP address on a running 3CX system, you need to reboot the machine and then re-provision the connected apps and IP phones. If you don’t want to set a static IP address, proceed to No. 6.
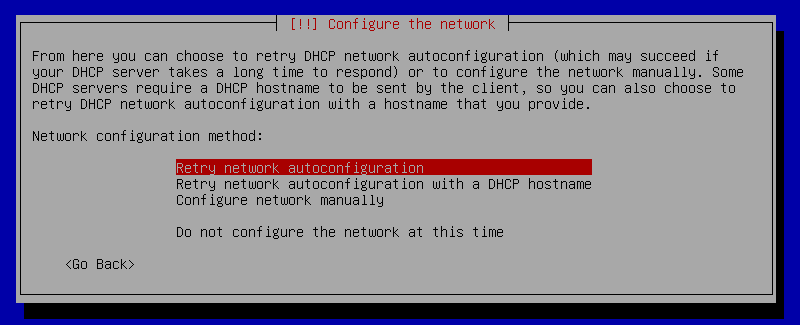
- Select “Configure Network Manually”and press the <Enter> key to set the system’s static IP address. Select <Continue> to enter the network netmask and select <Continue>. Then, enter the network default gateway IP address and select <Continue>. Finally, enter the name server(s) IP address(es) and select <Continue>.
- Enter a hostname for the computer so you can easily identify it on your network, using the characters ‘a’ to ‘z’, numbers ‘0’ to ‘9’ and the ‘-‘ character.
- Enter a domain name – use the same domain you used on other computers in the network, e.g.
mycompany.com
. Select <Continue> to proceed.
- Select the default system language and press the <Enter> key.
- Select your geographical location from the location menu and press the <Enter> key to proceed.
- Specify the
root
account password for the machine and select <Continue> to re-enter the password for verification purposes. Finally, select <Continue> to proceed. Note: Set a strong password for the
root
user, as this account has no restrictions!
- Select the system timezone and press the <Enter> key to proceed.
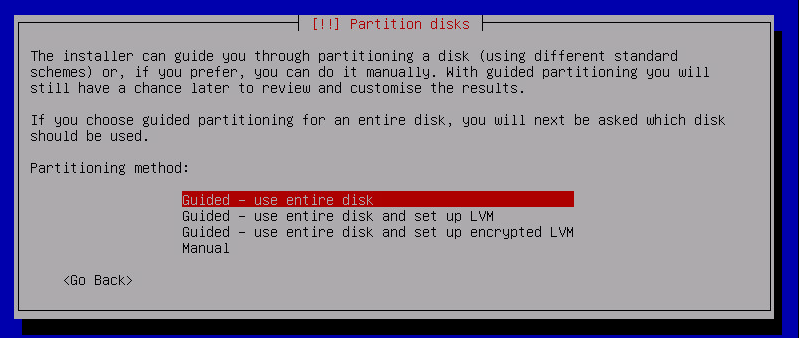
- Partition your disk, selecting “Guided – use the entire disk”. Press the <Enter> key to proceed.
- Confirm your disk selection by pressing the <Enter> key. If you are installing on a bare metal machine, all data on your disk will be erased!
- Select the “All files in one partition”partitioning scheme and press the <Enter> key to proceed.
- Select “Finish partitioning and write changes to disk”and press the <Enter> key to proceed to the 3CX Debian installation.
- Select ‘Yes’ and press the <Enter> key to confirm writing changes to the disk. The install process can take about 5-20 minutes, depending on your machine’s performance. When the Debian installer finishes, the machine is rebooted and the 3CX installation starts automatically.
- Now choose the “3CX Version xx”to install and then press <OK>. Agree to the “3CX License Agreement” to proceed.
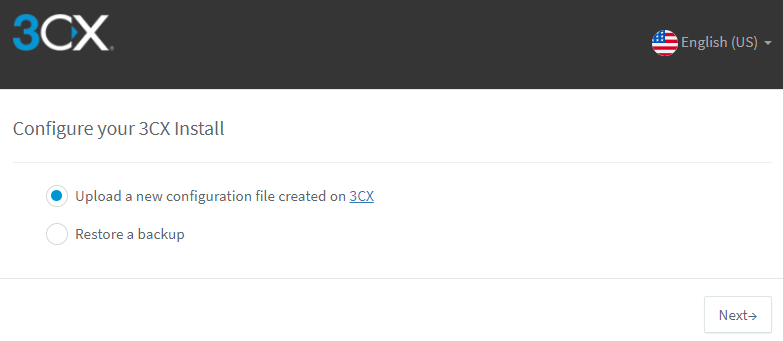
Step 5: Upload the Configuration File
After the 3CX Debian installation finishes and the machine is rebooted, you need to upload the configuration file to complete the installation.
- If you do not have a configuration file yet, go to www.3cx.com/install/
- Login with your 3CX account and configure an On Premise / Self Hosted PBX. At the end of the process, you will be given a link to the configuration file. You can copy the link or download the file. For more information see Installing 3CX
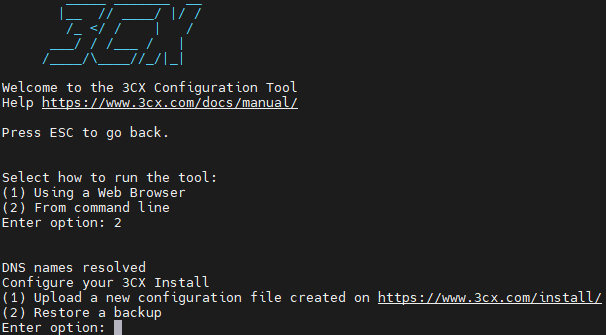
- You can choose to either:
- Use a web browser on http://<ip of machine>:5015 by selecting option 1
- Alternatively use the command line by selecting option 2
- Once your installation is ready, you will be prompted to set your password. Login to the PBX using the email you used to register.
Step 6: Configure the Split DNS
Configure the 3CX FQDN to function both internally and externally by implementing Split DNS.